Graphical display
The elements of the graphical display are: the reference point and the
graphical context, the colors, the drawings, the filling pattern of
closed forms, the texts and the bitmaps.
Reference point and graphical context
The Graphics library manages a unique main window. The
coordinates of the reference point of the window range from point (0,0)
at the bottom left to the upper right corner of the window. The main
functions on this window are:
-
open_graph, of type string -> unit, which opens a window;
- close_graph, of type unit -> unit, which closes it;
- clear_graph, of type unit -> unit, which clears it.
The dimensions of the graphical window are given by the functions
size_x and size_y.
The string argument of the function open_graph depends on the
window system of the machine on which the program is executed and is
therefore not platform independent. The empty string, however, opens a
window with default settings. It is possible to specify the size of the
window: under X-Windows, " 200x300" yields a window which is
200 pixels wide and 300 pixels high. Beware, the space at the beginning
of the string " 200x300" is required!
The graphical context contains a certain number of readable and/or
modifiable parameters:
| the current point: |
current_point : unit -> int * int |
| |
moveto : int -> int -> unit |
| the current color: |
set_color : color -> unit |
| the width of lines: |
set_line_width : int -> unit |
| the current character font: |
set_font : string -> unit |
| the size of characters: |
set_text_size : int -> unit |
Colors
Colors are represented by three bytes: each stands for the intensity
value of a main color in the RGB-model (red, green, blue), ranging from
a minimum of 0 to a maximum of 255. The function rgb (of
type int -> int -> int -> color) allows the generation of a new
color from these three components. If the three components are identical,
the resulting color is a gray which is more or less intense depending on
the intensity value. Black corresponds to the minimum intensity of each
component (0 0 0) and white is the maximum (255 255 255).
Certain colors are predefined: black, white,
red, green, blue, yellow,
cyan and magenta.
The variables foreground and background correspond
to the color of the fore- and the background respectively. Clearing the
screen is equivalent to filling the screen with the background color.
A color (a value of type color) is in fact an integer which
can be manipulated to, for example, decompose the color into its three
components (from_rgb) or to apply a function to it that inverts
it (inv_color).
(* color == R * 256 * 256  +  G * 256  +  B  *)
# let from_rgb (c : Graphics.color)  =
   let r = c / 65536  and  g = c / 256 mod 256  and  b = c mod 256
   in (r,g,b);;
val from_rgb : Graphics.color -> int * int * int = <fun>
# let inv_color (c : Graphics.color) =
    let (r,g,b) = from_rgb c
    in Graphics.rgb (255-r) (255-g) (255-b);;
val inv_color : Graphics.color -> Graphics.color = <fun>
The function point_color, of type int -> int -> color,
returns the color of a point when given its coordinates.
Drawing and filling
A drawing function draws a line on the screen. The line is of the current
width and color. A filling function fills a closed form with the current
color. The various line- and filling functions are presented in figure
5.1.
| drawing |
filling |
type |
| plot |
|
int -> int -> unit |
| lineto |
|
int -> int -> unit |
| |
fill_rect |
int -> int -> int -> int -> unit |
| |
fill_poly |
( int * int) array -> unit |
| draw_arc |
fill_arc |
int -> int -> int -> int -> int -> unit |
| draw_ellipse |
fill_ellipse |
int -> int -> int -> int -> unit |
| draw_circle |
fill_circle |
int -> int -> int -> unit |
Figure 5.1: Drawing- and filling functions.
Beware, the function lineto changes the position of the current
point to make drawing of vertices more convenient.
Drawing polygons
To give an example, we add drawing primitives which are not predefined. A
polygon is described by a table of its vertices.
# let draw_rect x0 y0 w h =
   let (a,b) = Graphics.current_point()
   and x1 = x0+w and y1 = y0+h
   in
     Graphics.moveto x0 y0;
     Graphics.lineto x0 y1; Graphics.lineto x1 y1;
     Graphics.lineto x1 y0; Graphics.lineto x0 y0;
     Graphics.moveto a b;;
val draw_rect : int -> int -> int -> int -> unit = <fun>

# let draw_poly r =
   let (a,b) = Graphics.current_point () in
   let (x0,y0) = r.(0) in Graphics.moveto x0 y0;
     for i = 1 to (Array.length r)-1 do
       let (x,y) = r.(i) in Graphics.lineto x y
     done;
     Graphics.lineto x0 y0;
     Graphics.moveto a b;;
val draw_poly : (int * int) array -> unit = <fun>
Please note that these functions take the same arguments as the predefined
ones for filling forms. Like the other functions for drawing forms,
they do not change the current point.
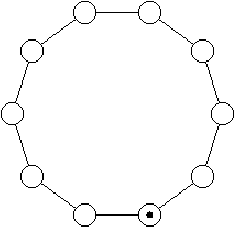
Illustrations in the painter's model
This example generates an illustration of a token ring network (figure
5.2).
Each machine is represented by a small circle. We place the set
of machines on a big circle and draw a line between the connected
machines. The current position of the token in the network is indicated
by a small black disk.
The function net_points generates the coordinates of the
machines in the network. The resulting data is stored in a table.
# let pi = 3.1415927;;
val pi : float = 3.1415927
# let net_points (x,y) l n =
   let a = 2. *. pi /. (float n) in
   let rec aux (xa,ya) i =
     if i > n then []
     else
       let na = (float i) *. a in
       let x1 = xa + (int_of_float ( cos(na) *. l))
       and y1 = ya + (int_of_float ( sin(na) *. l))  in
       let np = (x1,y1) in
         np::(aux np (i+1))
   in Array.of_list (aux (x,y) 1);;
val net_points : int * int -> float -> int -> (int * int) array = <fun>
The function draw_net displays the connections, the machines and the
token.
# let draw_net (x,y) l n sc st =
  let r = net_points (x,y) l n in
    draw_poly r;
    let draw_machine (x,y) =
      Graphics.set_color Graphics.background;
      Graphics.fill_circle x y sc;
      Graphics.set_color Graphics.foreground;
      Graphics.draw_circle x y sc
    in
      Array.iter draw_machine r;
      Graphics.fill_circle x y st;;
val draw_net : int * int -> float -> int -> int -> int -> unit = <fun>
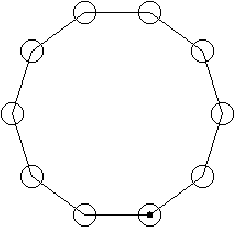
The following function call corresponds to the left drawing in figure
5.2.
# draw_net (140,20) 60.0 10 10 3;;
- : unit = ()
# save_screen "IMAGES/tokenring.caa";;
- : unit = ()
Figure 5.2: Tokenring network.
We note that the order of drawing objects is important. We first plot the
connections then the nodes. The drawing of network nodes erases some part
of the connecting lines. Therefore, there is no need to calculate the
point of intersection between the connection segments and the circles
of the vertices. The right illustration of figure 5.2
inverts the order in which the objects are displayed. We see that the
segments appear inside of the circles representing the nodes.
Text
The functions for displaying texts are rather simple. The two
functions draw_char (of type char -> unit) and
draw_string (of type string -> unit) display a
character and a character string respectively at the current point.
After displaying, the latter is modified. These functions do not change
the current font and its current size.
Note
The displaying of strings may differ depending on the graphical interface.
The function text_size takes a string as input and returns a
pair of integers that correspond to the dimensions of this string when
it is displayed in the current font and size.
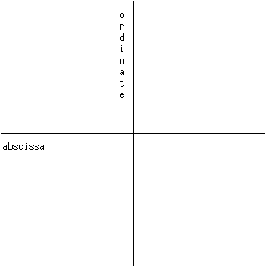
Displaying strings vertically
This example describes the function draw_string_v, which
displays a character string vertically at the current point. It is
used in figure 5.3. Each letter is displayed separately
by changing the vertical coordinate.
# let draw_string_v  s =
   let (xi,yi) = Graphics.current_point()
   and l = String.length s
   and (_,h) = Graphics.text_size s
   in
      Graphics.draw_char s.[0];
      for i=1 to l-1 do
        let (_,b) = Graphics.current_point()
        in Graphics.moveto xi (b-h);
           Graphics.draw_char s.[i]
       done;
     let (a,_) = Graphics.current_point() in Graphics.moveto a yi;;
val draw_string_v : string -> unit = <fun>
This function modifies the current point. After displaying, the point
is placed at the initial position offset by the width of one character.
The following program permits displaying a legend around the axes
(figure 5.3)
#
 Graphics.moveto 0 150; Graphics.lineto 300 150;
 Graphics.moveto 2 130; Graphics.draw_string "abscissa";
 Graphics.moveto 150 0; Graphics.lineto 150 300;
 Graphics.moveto 135 280; draw_string_v "ordinate";;
- : unit = ()
Figure 5.3: Legend around axes.
If we wish to realize vertical displaying of text, it is necessary
to account for the fact that the current point is modified by the
function draw_string_v. To do this, we define the function
draw_text_v, which accepts the spacing between columns and
a list of words as parameters.
# let draw_text_v n l =
   let f s = let (a,b) = Graphics.current_point()
             in draw_string_v s;
                Graphics.moveto (a+n) b
   in List.iter f l;;
val draw_text_v : int -> string list -> unit = <fun>
If we need further text transformations like, for example, rotation,
we will have to take the bitmap of each letter and perform the
rotation on this set of pixels.
Bitmaps
A bitmap may be represented by either a color matrix (color
array array) or a value of abstract type 1 image,
which is declared in library Graphics. The names and types of the
functions for manipulating bitmaps are given in figure 5.4.
| function |
type |
| make_image |
color array array -> image |
| dump_image |
image -> color array array |
| draw_image |
image -> int -> int -> unit |
| get_image |
int -> int -> int -> int -> image |
| blit_image |
image -> int -> int -> unit |
| create_image |
int -> int -> image |
Figure 5.4: Functions for manipulating bitmaps.
The functions make_image and dump_image are
conversion functions between types image and color array
array. The function draw_image displays a bitmap starting at
the coordinates of its bottom left corner.
The other way round, one can capture a rectangular part of the screen to
create an image using the function get_image and by indicating
the bottom left corner and the upper right one of the area to be captured.
The function blit_image modifies its first parameter (of
type image) and captures the region of the screen where the
lower left corner is given by the point passed as parameter. The size
of the captured region is the one of the image argument. The function
create_image allows initializing images by specifying their
size to use them with blit_image.
The predefined color transp can be used to create transparent
points in an image. This makes it possible to display an image within a
rectangular area only; the transparent points do not modify the initial
screen.
Polarization of Jussieu
This example inverts the color of points of a bitmap. To do this, we use
the function for color inversion presented on page ??,
applying it to each pixel of a bitmap.
# let inv_image i =
   let inv_vec = Array.map (fun c -> inv_color c) in
   let inv_mat = Array.map inv_vec in
   let inverted_matrix = inv_mat (Graphics.dump_image i) in
   Graphics.make_image inverted_matrix;;
val inv_image : Graphics.image -> Graphics.image = <fun>
Given the bitmap jussieu, which is displayed in the left half
of figure 5.5, we use the function inv_image
and obtain a new ``solarized'' bitmap, which is displayed in the right
half of the same figure.
# let f_jussieu2 () = inv_image jussieu1;;
val f_jussieu2 : unit -> Graphics.image = <fun>
Figure 5.5: Inversion of Jussieu.
Example: drawing of boxes with relief patterns
In this example we will define a few utility functions for drawing boxes
that carry relief patterns. A box is a generic object that is useful in
many cases. It is inscribed in a rectangle which is characterized by a
point of origin, a height and a width.
| To give an impression of a box with a relief pattern, it is sufficient
to surround it with two trapezoids in a light color and two others in
a somewhat darker shade. |
|
|
 |
| Inverting the colors, one can give the impression that the boxes are on
top or at the bottom. |
|
|
 |
Implementation
We add the border width, the display mode (top, bottom, flat) and the
colors of its edges and of its bottom.
This information is collected in a record.
# type relief = Top | Bot | Flat;;
# type box_config =
  { x:int; y:int; w:int; h:int; bw:int; mutable r:relief;
    b1_col : Graphics.color;
    b2_col : Graphics.color;
    b_col : Graphics.color};;
Only field r can be modified.
We use the function draw_rect defined at page
??, which draws a rectangle.
For convenience, we define a function for drawing the outline of a box.
# let draw_box_outline bcf col =
  Graphics.set_color col;
  draw_rect bcf.x bcf.y bcf.w  bcf.h;;
val draw_box_outline : box_config -> Graphics.color -> unit = <fun>
The function of displaying a box consists of three parts: drawing the
first edge, drawing the second edge and drawing the interior of the box.
# let draw_box bcf =
   let x1 = bcf.x and y1 = bcf.y in
   let x2 = x1+bcf.w and y2 = y1+bcf.h in
   let ix1 = x1+bcf.bw and ix2 = x2-bcf.bw
   and iy1 = y1+bcf.bw and iy2 = y2-bcf.bw in
   let border1 g =
     Graphics.set_color g;
     Graphics.fill_poly
       [| (x1,y1);(ix1,iy1);(ix2,iy1);(ix2,iy2);(x2,y2);(x2,y1) |]
   in
   let border2 g =
     Graphics.set_color g;
     Graphics.fill_poly
       [| (x1,y1);(ix1,iy1);(ix1,iy2);(ix2,iy2);(x2,y2);(x1,y2) |]
   in
   Graphics.set_color bcf.b_col;
   ( match bcf.r with
         Top  ->
           Graphics.fill_rect ix1 iy1 (ix2-ix1) (iy2-iy1);
           border1 bcf.b1_col;
           border2 bcf.b2_col
       | Bot  ->
           Graphics.fill_rect ix1 iy1 (ix2-ix1) (iy2-iy1);
           border1 bcf.b2_col;
           border2 bcf.b1_col
       | Flat ->
           Graphics.fill_rect x1 y1 bcf.w bcf.h );
   draw_box_outline bcf Graphics.black;;
val draw_box : box_config -> unit = <fun>
The outline of boxes is highlighted in black. Erasing a box fills the
area it covers with the background color.
# let erase_box bcf =
    Graphics.set_color bcf.b_col;
    Graphics.fill_rect (bcf.x+bcf.bw) (bcf.y+bcf.bw)
                       (bcf.w-(2*bcf.bw)) (bcf.h-(2*bcf.bw));;
val erase_box : box_config -> unit = <fun>
Finally, we define a function for displaying a character string at the
left, right or in the middle of the box. We use the type position
to describe the placement of the string.
# type position = Left | Center | Right;;
type position = | Left | Center | Right
# let draw_string_in_box pos str bcf col =
     let (w, h) = Graphics.text_size str in
     let ty = bcf.y + (bcf.h-h)/2 in
     ( match pos with
           Center -> Graphics.moveto (bcf.x + (bcf.w-w)/2) ty
         | Right  -> let tx = bcf.x + bcf.w - w - bcf.bw - 1 in
                     Graphics.moveto tx ty
         | Left   -> let tx = bcf.x + bcf.bw + 1 in Graphics.moveto tx ty  );
     Graphics.set_color col;
     Graphics.draw_string str;;
val draw_string_in_box :
  position -> string -> box_config -> Graphics.color -> unit = <fun>
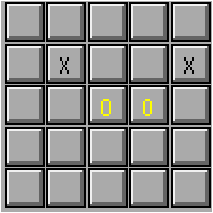
Example: drawing of a game
We illustrate the use of boxes by displaying the position of a game of
type ``tic-tac-toe'' as shown in figure 5.6. To simplify
the creation of boxes, we predefine colors.
# let set_gray x =  (Graphics.rgb x x x);;
val set_gray : int -> Graphics.color = <fun>
# let gray1= set_gray 100 and gray2= set_gray 170 and gray3= set_gray 240;;
val gray1 : Graphics.color = 6579300
val gray2 : Graphics.color = 11184810
val gray3 : Graphics.color = 15790320
We define a function for creating a grid of boxes of same size.
# let rec create_grid nb_col n sep b  =
   if n < 0 then []
   else
     let px = n mod nb_col and py = n / nb_col in
     let nx = b.x +sep + px*(b.w+sep)
     and ny = b.y +sep + py*(b.h+sep) in
     let b1 = {b with x=nx; y=ny} in
     b1::(create_grid nb_col (n-1) sep b);;
val create_grid : int -> int -> int -> box_config -> box_config list = <fun>
And we create the vector of boxes:
# let vb =
   let b =  {x=0; y=0; w=20;h=20; bw=2;
             b1_col=gray1; b2_col=gray3; b_col=gray2; r=Top} in
   Array.of_list (create_grid 5 24 2  b);;
val vb : box_config array =
  [|{x=90; y=90; w=20; h=20; bw=2; r=Top; b1_col=6579300; b2_col=15790320;
     b_col=11184810};
    {x=68; y=90; w=20; h=20; bw=2; r=Top; b1_col=6579300; b2_col=15790320;
     b_col=...};
    ...|]
Figure 5.6 corresponds to the following function calls:
# Array.iter draw_box vb;
 draw_string_in_box Center "X" vb.(5) Graphics.black;
 draw_string_in_box Center "X" vb.(8) Graphics.black;
 draw_string_in_box Center "O" vb.(12) Graphics.yellow;
 draw_string_in_box Center "O" vb.(11) Graphics.yellow;;
- : unit = ()
Figure 5.6: Displaying of boxes with text.